If you have a large database of products that you'd like to add to your Shopping Cart Inventory, you can save yourself a great deal of time by importing a CSV file of the database. Most database programs will allow you to export the data inside a file as a CSV file. Click here to download an example of the shop CSV file, there are a lot of columns in the file but you may only need to use a small number of them. Contact your local Internet Consultant for further explanation of the shop CSV file. To Import your Products:- Within your website account navigate to the Shop Inventory item and click on the Import Products option which will take you to the below screen:
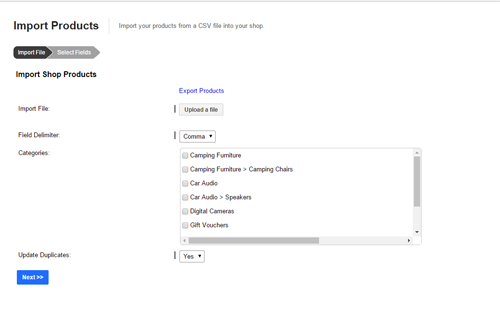 - Next click on the Upload a file button and find your CSV file of your products.
- Once you have uploaded your file the next option is the Field Delimiter. Depending on how your CSV file has been created will depend on what option you choose from but most of the time it is a comma delimited file. Leave the default option as it is.
- Next choose what category or categories that you want the products to belong to. Please keep in mind that you may need to make multiple CSV files if you want certain products to belong to certain categories. A good tip is to make one CSV file for every category that you have.
- Once you have selected your category the last option is to choose whether you want to update any duplicates you have in your shopping cart right now. Good practice for adding new items is to continue adding the items to the existing CSV file and upload this file over and over again which means that you will have duplicate entries. You will need to make the decision if you want any existing items to be updated.
- After all the above options have been selected click on the Next button to go to the page where you map your fields. It is important to note that you must have the Product ID and Product Name to upload the item into the shopping cart, as these are required fields.
- You will see that you will have rows and columns but only 5 rows will be visible but all columns will be visible. The reason only 5 rows are visible is because you might have some rows at the top of your CSV file that may only be headings that you do want to import. If this is the case on the left of each row there is a tick box, once ticked that row will not be imported into the product database. All you do on this screen is map the column to the product field by using the drop down above each column: if your first field is Product ID, you match this with the column that has all the product ids in it. Your CSV file headings do not have to match the drop down option, just as long as the data in that column is for the drop down field. Do this for every column you have in your CSV file. If you have a column that you do not need imported, leave the column drop down heading to "Ignore Column."
- When you are done selecting the column headings, click Save Details.
When the page refreshes, you'll start to see a list of your recently imported products. The import process could take a short while depending on how many entries you have in your CSV file. | )
)
)
)